The song Pride and Joy is another example of the legendary tone of the late, great Stevie Ray Vaughan. Recorded at the end of 1982 (and released in 1983), this song is one of Stevie’s own original songs from the album Texas Flood, which also features some Blues and R&B cover tunes.
Recorded at Jackson Browne’s studio in L.A., engineer Richard Mullen gives us some great insights into the equipment used by Stevie. He had the band set up together, like they would on stage, and only recorded two takes of each track.
Stevie was a big fan of the now legendary Howard Dumble amplifiers. Apparently, he used at least one of these in this session, as well as a couple of Fender Vibroverbs.
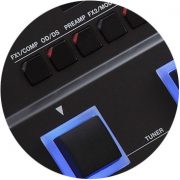
To recreate this tone, I’m going to use the BOSS GT-1 entry-level, multi-effects unit. While it’s great if you can afford a Dumble amplifier, (at last check, they start at around $40,000…), that still doesn’t help you to simulate all of the other elements of the recording process, which I’ll explain in a moment.
In this article, we’re just going to concentrate on the clean rhythm part of the tone (not the overdriven intro and solo). At its heart, this is a simple tone with only a Strat into an amp, very basic. But, the simple tones can be the most difficult to simulate as there are no obtuse effects to hide behind. I almost gave up on this several times (and some might say that I should have!) but I think it’s well within the ballpark at this point, so let’s dive in…
Firstly, let’s break down the components of tone in a process I call the 4 Elements of Tone.
Visit guitarfxpatches.com and download free guitar tone from Pride And Joy using Discount Code: GT1PRIDE
Contributed by Josh Munday – Tone Designer for the Roland Australia Blog
1. The Guitar
 SRV had a range of Fender Stratocasters at his disposal and apparently he’d switch between a 1959 and a 1963 model. I used a Mexican Fender Strat in the video for this tone design segment. I like to use very “plain” and familiar sounding guitars for tone design, because it’s easier for others to replicate and shows that this is possible even with basic/affordable gear (i.e. Mexican Strat + GT-1). Most Strats will get you close enough to his Strat tone to work with.
2. The Pickup Selection
 For the pickup selection, I’ve used Position 4, which has the middle pickup and neck pickup together. This position produces some nice bottom end, with a somewhat scooped midrange and nice, glassy top end on most Strats (often used as an “acoustic simulation” position). SRV used this pickup selection quite a lot.
3. The Amp
 NOTE: Usually at this stage, I would start going through the amp settings, but before we do that, there’s an effects adjustment you might want to make. With this particular tone, SRV is tuned to Eb, so you have some choices here.
You can either:
- Tune to Eb.
- Play the song in E.
- Use the FX1 section of the GT-1 to tune down to Eb (which is what I have done as I played this within a medley of famous guitar tones, so I didn’t have the luxury of re-tuning just for this song).
No matter which option you choose, you should do it before we begin the process of Tone Design, as all of these options change the tone of your guitar somewhat (especially using the pitch shift effect).
In addition, if you want to use the GT-1 to detune, go to the FX-1 section at the start of the signal chain. Select PITCH SHIFTER and turn the PITCH to -1, EFFECT LEVEL to 100 and DIRECT LEVEL to 0.
Now on to the amp…
The session engineer, Richard Mullen, has said that Stevie was running through 2 x Fender Vibroverbs and a Dumble Amplifier, (through a 4 x 12 cabinet). What we don’t know is if he was running them all simultaneously or individually and which one was used on this particular track. In the end, it doesn’t really matter what he did, just whether or not we can hear enough in the tone to begin the simulation.
When selecting an amp, there are some basic rules of thumb that will help:
ALWAYS START WITH EVERYTHING OFF!!!
I can’t stress this enough. First of all, find the OFF button for everything in the signal chain so all you can hear is your dry old guitar sound coming through. Remember, any multi-FX/amp simulators like the BOSS GT-1 are just simulating a room full of gear, so think about it like that. You wouldn’t walk into a room full of amps and FX and start by turning everything ON would you? You would plug into an amp, get a good basic tone, then turn on any effects one at a time and build up your sound…likewise with any multi-FX.
- Set the EQ “flat” (i.e. all settings at the halfway point or 12 o’clock). This gives you a neutral starting point so that the EQ isn’t colouring the tone too much yet.
- Put the gain up to about a quarter to half a turn, so you can hear the Gain character.
We’re trying to simulate a Fender Vibroverb or Dumble amplifier, (which at their heart, are a hot-rodded, Fender-style amplifier anyway). That being said, none of the obviously named Fender-style amplifier simulators in the GT-1 were quite right, so I ended up going with the NATURAL CLEAN amp setting. I found that when I give this amp some more gain, it has some of the right characteristics for the tone.
I’ll often use quite extreme EQ settings. Remember, we’re trying to reproduce the “recorded” version of this tone. While SRV might not have been running these EQ settings, the mixing and mastering processes can change the tone. Therefore, we might need to make adjustments that seem a little “outside the box”.
The settings I’ve chosen on the amp are:
- GAIN – 46
- LEVEL – 74
- SPEAKER TYPE – ORIGINAL
- BASS – 70
- MIDDLE – 87
- TREBLE – 97
- PRESENCE – 46
As well as the EQ setting for the amp, I’ve also used the EQ that is within the MASTER SETTINGS part of the signal chain to tweak the tone some more. Boosting or cutting the EQ on the Amplifier Simulator has a different effect on the tone than the MASTER SETTING part. Think of the AMP EQ as changing the EQ on the Virtual Amplifier and the MASTER SETTINGS EQ as changing the EQ on the mixing board, after it has been recorded.
The settings I’ve selected in the MASTER SETTINGS section are:
- PATCH LEVEL – 36
- LOW GAIN – 2
- MID GAIN – 11
- MID FREQ – You can also select the frequency of the midrange in this part, so I turned this to 1.25kHz to try and simulate the specific midrange frequency of the recording.
- Q MID – 1. The “Q” determines how much the frequencies surrounding the midrange frequency you’ve set will be affected. The lower the number, the more frequencies surrounding the MID FREQ setting will be affected when you boost or cut in the MID GAIN setting.
- HIGH GAIN – 3
This should get us pretty close already. Now to the effects.
4. The Effects
 So before we get started on the effects section, I just want to explain what I mean by “Effects”. This can mean not only traditional effects that you would run in the main input or in the effects loop of your amplifier, (such as overdrive pedals, chorus, etc), but also any effects that were added later in the mixing process or “Post-Production” effects.
Delays, for instance, are often added after the track has been recorded and would not have been heard by the guitarist at the time of recording. Other elements that I would count in the effects section are:
- EQ and Compression that were adjusted in the mixing stage.
- The microphone that is on the speaker cabinet. What did it sound like?
- Was there a second microphone in the room away from the speaker cabinet?
- How far away from the speaker cabinet was the mic?
- How loud is that second mic in the mix?
- What did the room sound like from that room mic?
- etc…etc…etc….and on and on it goes.
Now, this is starting to sound super-complicated right? Well let’s just go through each part step-by-step and I’ll take you through how we can simulate some of these elements.
Room Microphone Simulation
In many guitar recordings, we are hearing much more than just the amplifier with a microphone on the speaker. Often there is another mic in the room that can be a few feet away from the speaker. This microphone will have a different tone (by virtue of the distance) and can pick up some of the ambience from the room. So depending on how loud this room mic is in the final mix, it can alter the tone quite significantly. It can also change the EQ and some of the character of the sound through phasing. When 2 source signals are turned up in the mix, the frequencies interfere with each other, and this can have a desirable effect, or not so desirable depending on the placement of both the close and room mic.
In the BOSS GT-1, we don’t have the luxury of selecting a room mic and/or managing its placement in the “Virtual Room”, but there is a trick that I use quite often that can simulate the room mic as a “quick and dirty” replacement and often works quite well.
WARNING: AUDIO GEEKERY COMING UP
Because sound travels at approximately 1 foot per millisecond, (it’s actually 1.13 feet per millisecond but who’s counting!?) we can simulate the microphone in the room with a single delay timed at the appropriate millisecond setting. So, for a mic 12 feet away from the speaker we set a single delay at 12ms. If you put it up too loud, sometimes you can hear a “metallic” effect to the tone.
From an interview I read, the engineer for this recording session (Richard Mullen), has said that he placed the SM57 microphones only 3 or 4 inches from the cone of the speaker. Within the GT-1, we don’t have an option to move the microphone placement (and the default position in the amplifier simulations is very close to the cone of the speaker), so I’ve used the delay to simulate some distance from the speaker to the mic.
So in the GT-1 go to the DELAY setting in the signal chain and use the following settings:
- TYPE – STANDARD
- TIME – 10ms. There’s our 10 foot away room mic. Yes, I know the engineer said a few inches but that didn’t quite sound correct in the GT-1, so I just kept moving it away until it sounded closest.
- FEEDBACK – 0 (which means just a single delay).
- E.LEVEL – 87. This is quite loud in our virtual “mix” and will have an influence on the tone that you can hear. Try it even louder and switch it on and off to hear the difference.
Reverb
The recording studio that they recorded this track in was a converted warehouse, so we can get a hint as to what type of reverb to use from that. I’ve used the HALL2 setting in the REVERB section of the signal chain.
The settings I’ve used are:
- TYPE – HALL2
- TIME – 2.1s
- E.LEVEL – 70
- Over the page, you will see 2 more settings – LOW CUT and HIGH CUT. These 2 settings dictate how large a frequency band you will hear the reverb in. Therefore, I’ve cut everything from 160Hz down and 4kHz up, so it’s a more midrange focused reverb.
The setting are:
- LOW CUT – 160Hz
- HIGH CUT – 4.00kHz
Now onto the specific Modulation Effect.
Modulation Effect
We can’t be entirely sure which amp (or combination of amps were used). To my ears, there’s some “movement” in the high-end frequencies in this recording. Maybe it was the Tremolo on one of the Fender Vibroverbs turned on slightly, or maybe SRV used some other modulated effect. When you turn on a modulation effect, you can get a nice definition in the high-end, and that’s what I can hear a little bit of in this recording. So whether it’s there or not, by using this effect, I believe it gets us a little closer to the tone.
For this, I used the FX2 section and selected the VIBRATO effect and the setting are:
- RATE – 64
- DEPTH – 28
- TRIGGER – ON
- RISE TIME – 35
- LEVEL – 44
So there you have it, the guitar tone from Pride and Joy. If you have a BOSS GT-1 and don’t want to have to program this tone yourself, you can download it from my website – guitarfxpatches.com.
Just enter this Discount Code and you can get it for FREE!
Website = guitarfxpatches.com
Discount Code = GT1PRIDE
Related Articles
JIMI HENDRIX ‘VOODOO CHILD (SLIGHT RETURN)’ TONE DISSECTED
THE BEATLES ‘REVOLUTION’ TONE DISSECTED
THE POLICE ‘WALKING ON THE MOON’ TONE DISSECTED
VAN HALEN ‘ERUPTION’ TONE DISSECTED
FOUR ELEMENTS OF GUITAR TONE
TONES IN TIME – 60S ROCK
JIMI HENDRIX’S ‘FOXY LADY’ TONE DISSECTED
Related Product